|
|
Quiche is such a quick and easy, but still kind of “fancy” dish to make for breakfast, brunch, lunch or dinner. Quiche is fun to make because you can use pretty much any kind of meat and/or vegetables, and cheese as the filling. Once you have the basic recipe down, it’s time to get creative.

Since I live in Hawaii and the weather here is not “pie crust-friendly,” I usually opt for a store bought crust. Usually, I buy the Mrs. Smith deep dish variety, in a two pack, because this is the brand that is usually is not cracked and broken, like some of the other brands. I may get braver and try homemade pie crusts again, one day, but it will have to be on a very cold day!
Quiche is great to make for Easter brunch, along with a Cinnamon French Toast Bread Pudding and a Island Fruit Salad and/or Green Salad.
 Basic Quiche Basic Quiche
1 Frozen Deep Dish Pie Crust
3 Large Eggs
1 Cup Heavy Cream
1 Cup Shredded Gruyere Cheese
1 Tsp Nutmeg
1 Tsp White Pepper
1 Tsp Salt
Preheat oven to 400 degrees. Heat butter in small saute pan, over medium heat, add diced onion. Saute until onions are translucent, about 5 minutes. Remove from heat. Prep and make the rest of the Filling, as directed below.
Combine cream eggs, nutmeg, salt and pepper in a mixing bowl. Whip with a whisk until combined. Gently stir in Gruyere Cheese
Place pie crust on a baking sheet. Add Filling, as directed. Pour egg mixture into crust over the Filling. Bake for 35 minutes, until slightly golden brown. Remove from oven and cool for at least 15 minutes before serving. May be served hot or cold.
FILLING
  
Red Pepper & Feta Quiche
1/2 red pepper
1/2 yellow pepper
1/2 TBSP butter.
4 oz. crumbled Feta Cheese
1/2 Yellow Onion, finely diced (about 1/2 cup)
Dice pepper. Saute diced peppers and onions with butter until softened, about 5 minutes. Evenly spread cooked peppers in bottom of quiche shell and spinkle with feta cheese before pouring in egg mixture. Bake as directed above.
Bacon & Spinach Quiche
1/2 Pound Bacon
4 Cups Fresh Baby Spinach
1/2 Yellow Onion, finely diced (about 1/2 cup)
Cook bacon until crisp. Drain excess fat of bacon on paper towel. Let cool and crumble into small pieces. Remove all but 1 TSP bacon fat from saute pan. Add onions, saute until translucent, about 5 min. Add spinach. Cook, stirring occasionally for 3-4 minutes or so until spinach is wilted and reduced to about 1 cup. Spread spinach/onion mixture evenly over bottom of empty quiche crust. Sprinkle crumbled bacon over top. Add egg mixture. Bake as directed above.
Serves 4-6
 Dean Helping Make Oven Roasted Tomatoes Aaahh, Spring Break… Always has been one of my favorite times of year. Well, at least it was, when I was in school. My 5 year old son is on Spring Break, right now, and I am not taking any days away from work, so I am a little stressed about keeping him busy and not glued to the TV. It is only Monday and I am already running out of ideas.
Today, I decided we would spend some time cooking together. First we got out the juicer and made spinach, orange, lemon, apple juice. Looked like a pitcher of tie-dye before we stirred it! Not exactly my best creation ever, but Dean drank it and liked it. Next we roasted tomatoes for a pizza. Making pizza with kids is great fun because they can do their own thing, once you have a good base.
The pizza we made was non-traditional, but still quite delicious. The base is a light spread of pesto, with oven-roasted tomatoes. This is topped with fresh spinach and ricotta, parmesan and mozarella cheeses. I used a store-bought crust which was pretty average, unfortunately. Next time, I will make my own crust and include the recipe. If you have a good one, please send it to me!!
 3 Cheese Pizza, with Pesto, Roasted Tomatoes, and Spinach 3 Cheese Pizza, with Pesto, Roasted Tomatoes, and Spinach
1 Store Bought Pizza Crust (or Preferrably, Make Your Own)
1 TBSP Olive Oil
1/8 Cup Basil Pesto (Store-bought is OK, or Make Your Own)
1 Tsp Kosher Salt
Oven Roasted Tomatoes (made from 2 Pounds Cocktail Tomatoes)
Approx. 1/2 Cup Ricotta Cheese (whole milk or skim)
1/3 Cup Shaved Parmesan Cheese
1 Cup Baby Organic Spinach Leaves
1/2 Cup Mozzarella Cheese
Baste crust with olive oil, paying special attention to the outside edge of the crust. Take a small spatula and spread pesto over center of the pizza. It should not be too thick, just lightly spread. Sprinkle kosher salt over pizza. Attractively and evenly lay the roasted tomatoes over the top of the pizza. Where you see pesto through the tomatoes, drop small dollops all over top of pizza. Since this is a pizza, measurements for toppings don’t have to be exact. Feel free to use a little more or less of something if you want to.
 
Sprinkle 1/3 cup parmesan cheese over tomatoes and ricotta. Evenly spread spinach leaves on top of pizza.
 
Finish by evenly spreading 1/2 Cup of Mozarella cheese over the top of the pizza. Bake at 450 degrees for 7-8 minutes, until cheese is melted and crust is golden. Serves 3-4.


Can you tell I love tomatoes? One of my favorite ways to enjoy them is Oven Roasted. The flavor is so concentrated and smoky, and great for making sauces, pizzas, tossed in pasta or salads…so many uses. Also, very easy to make. I like to use locally grown Hamakua Cocktail Tomatoes when I roast tomatoes. These are smaller than regular tomatoes and larger than cherry or grape tomatoes, just about the size of a golf ball.

Oven Roasted Tomatoes
2 clamshells, (2 pounds) Cocktail Tomatoes
Kosher Salt
Olive Oil
8 cloves garlic
Preheat oven to 375 degrees.
Slice tomatoes in half vertically from top to bottom. Arrange seed side up on a lined sheet pan.
Drizzle with olive oil. Sprinkle with kosher salt.
Smash garlic cloves, and roughly chop. Drizzle garlic with olive oil. Toss garlic on top of tomatoes.
Bake for 45 minutes.

No single dish says “Hawaii” to me more than Ahi Poke. It brings back memories of when I first lived in the Hawaiian islands, on Maui, during my windsurfing-bookwriting-sabbatical-from-San-Francisco-lawyer-life days. My roommate, Rick, and I used to get ”Poke” (make sure you say Po-Kay, not Po-Key, I think that means something else!) from the market every time we went shopping. It was spicy and rich, and crunchy from the green onions, all at the same time. We were both on tight budgets, so it was a luxury item we looked forward to. Even so, the small container we picked up never lasted more than a few hours.
 Ahi Poke means simply “Ahi, Sliced.” Ahi Poke originated with Hawaii’s fishermen and was nothing more than a blend sliced fresh raw ahi tuna, limu (seaweed) and Hawaiian salt. With the Japanese influence in the islands, the recipe has evolved to often include Shoyu (soy sauce) and/or wasabi. Ahi Poke means simply “Ahi, Sliced.” Ahi Poke originated with Hawaii’s fishermen and was nothing more than a blend sliced fresh raw ahi tuna, limu (seaweed) and Hawaiian salt. With the Japanese influence in the islands, the recipe has evolved to often include Shoyu (soy sauce) and/or wasabi.
Local-style Ahi Poke is something you’ll find here on the islands at almost any gathering or special occasion. But it’s not just for parties. It’s an every day kind of thing. Many grocery stores even have a special deli section that features just Ahi Poke, in several different preparations.
On the mainland, people know Ahi Poke as Tuna Tartare. Tuna Tartare (and Ahi Poke) come in more variations that you can name. One of my favorite dishes for years, at Michael Mina’s renowned San Francisco restaurant, Aqua, was the Tuna Tartare. I really don’t think I have ever had a better version than that original recipe.
So luckily for me, the other day, our neighbor, Michael, brought over some fresh Ahi that he had just caught. Perfect opportunity to make my own version of Ahi Poke. This recipe is loosely based on the Tuna Tartare that was once served at Aqua. I’ve tried to remember what I think was in it, but it has been about 10 years and my memory fails me!

Mainland-Style Ahi Poke (aka Tuna Tartare)
 1 Pound Fresh, Sashimi Grade Ahi 1 Pound Fresh, Sashimi Grade Ahi
1 1/2 TBS Sesame Oil
1 Tsp Kosher Salt
1 Tsp Fresh Grated Ginger (or 1/4 Tsp of Ground Powdered Ginger)
1 Tsp Red Chili Powder
1/4 Tsp Allspice
1/4 Tsp Cinnamon
1 Red Anjou Pear (Peeled, cored)
4 TBSP toasted Pine Nuts
Optional: 1 Raw Egg Yolk (if not using egg yolk, increase sesame oil by 1/2 TBSP)
Toast the pine nuts on foil, on a baking sheet, in the oven at 450 degrees, for about 10 minutes. Be careful not to burn. Remove from oven and from the baking sheet.

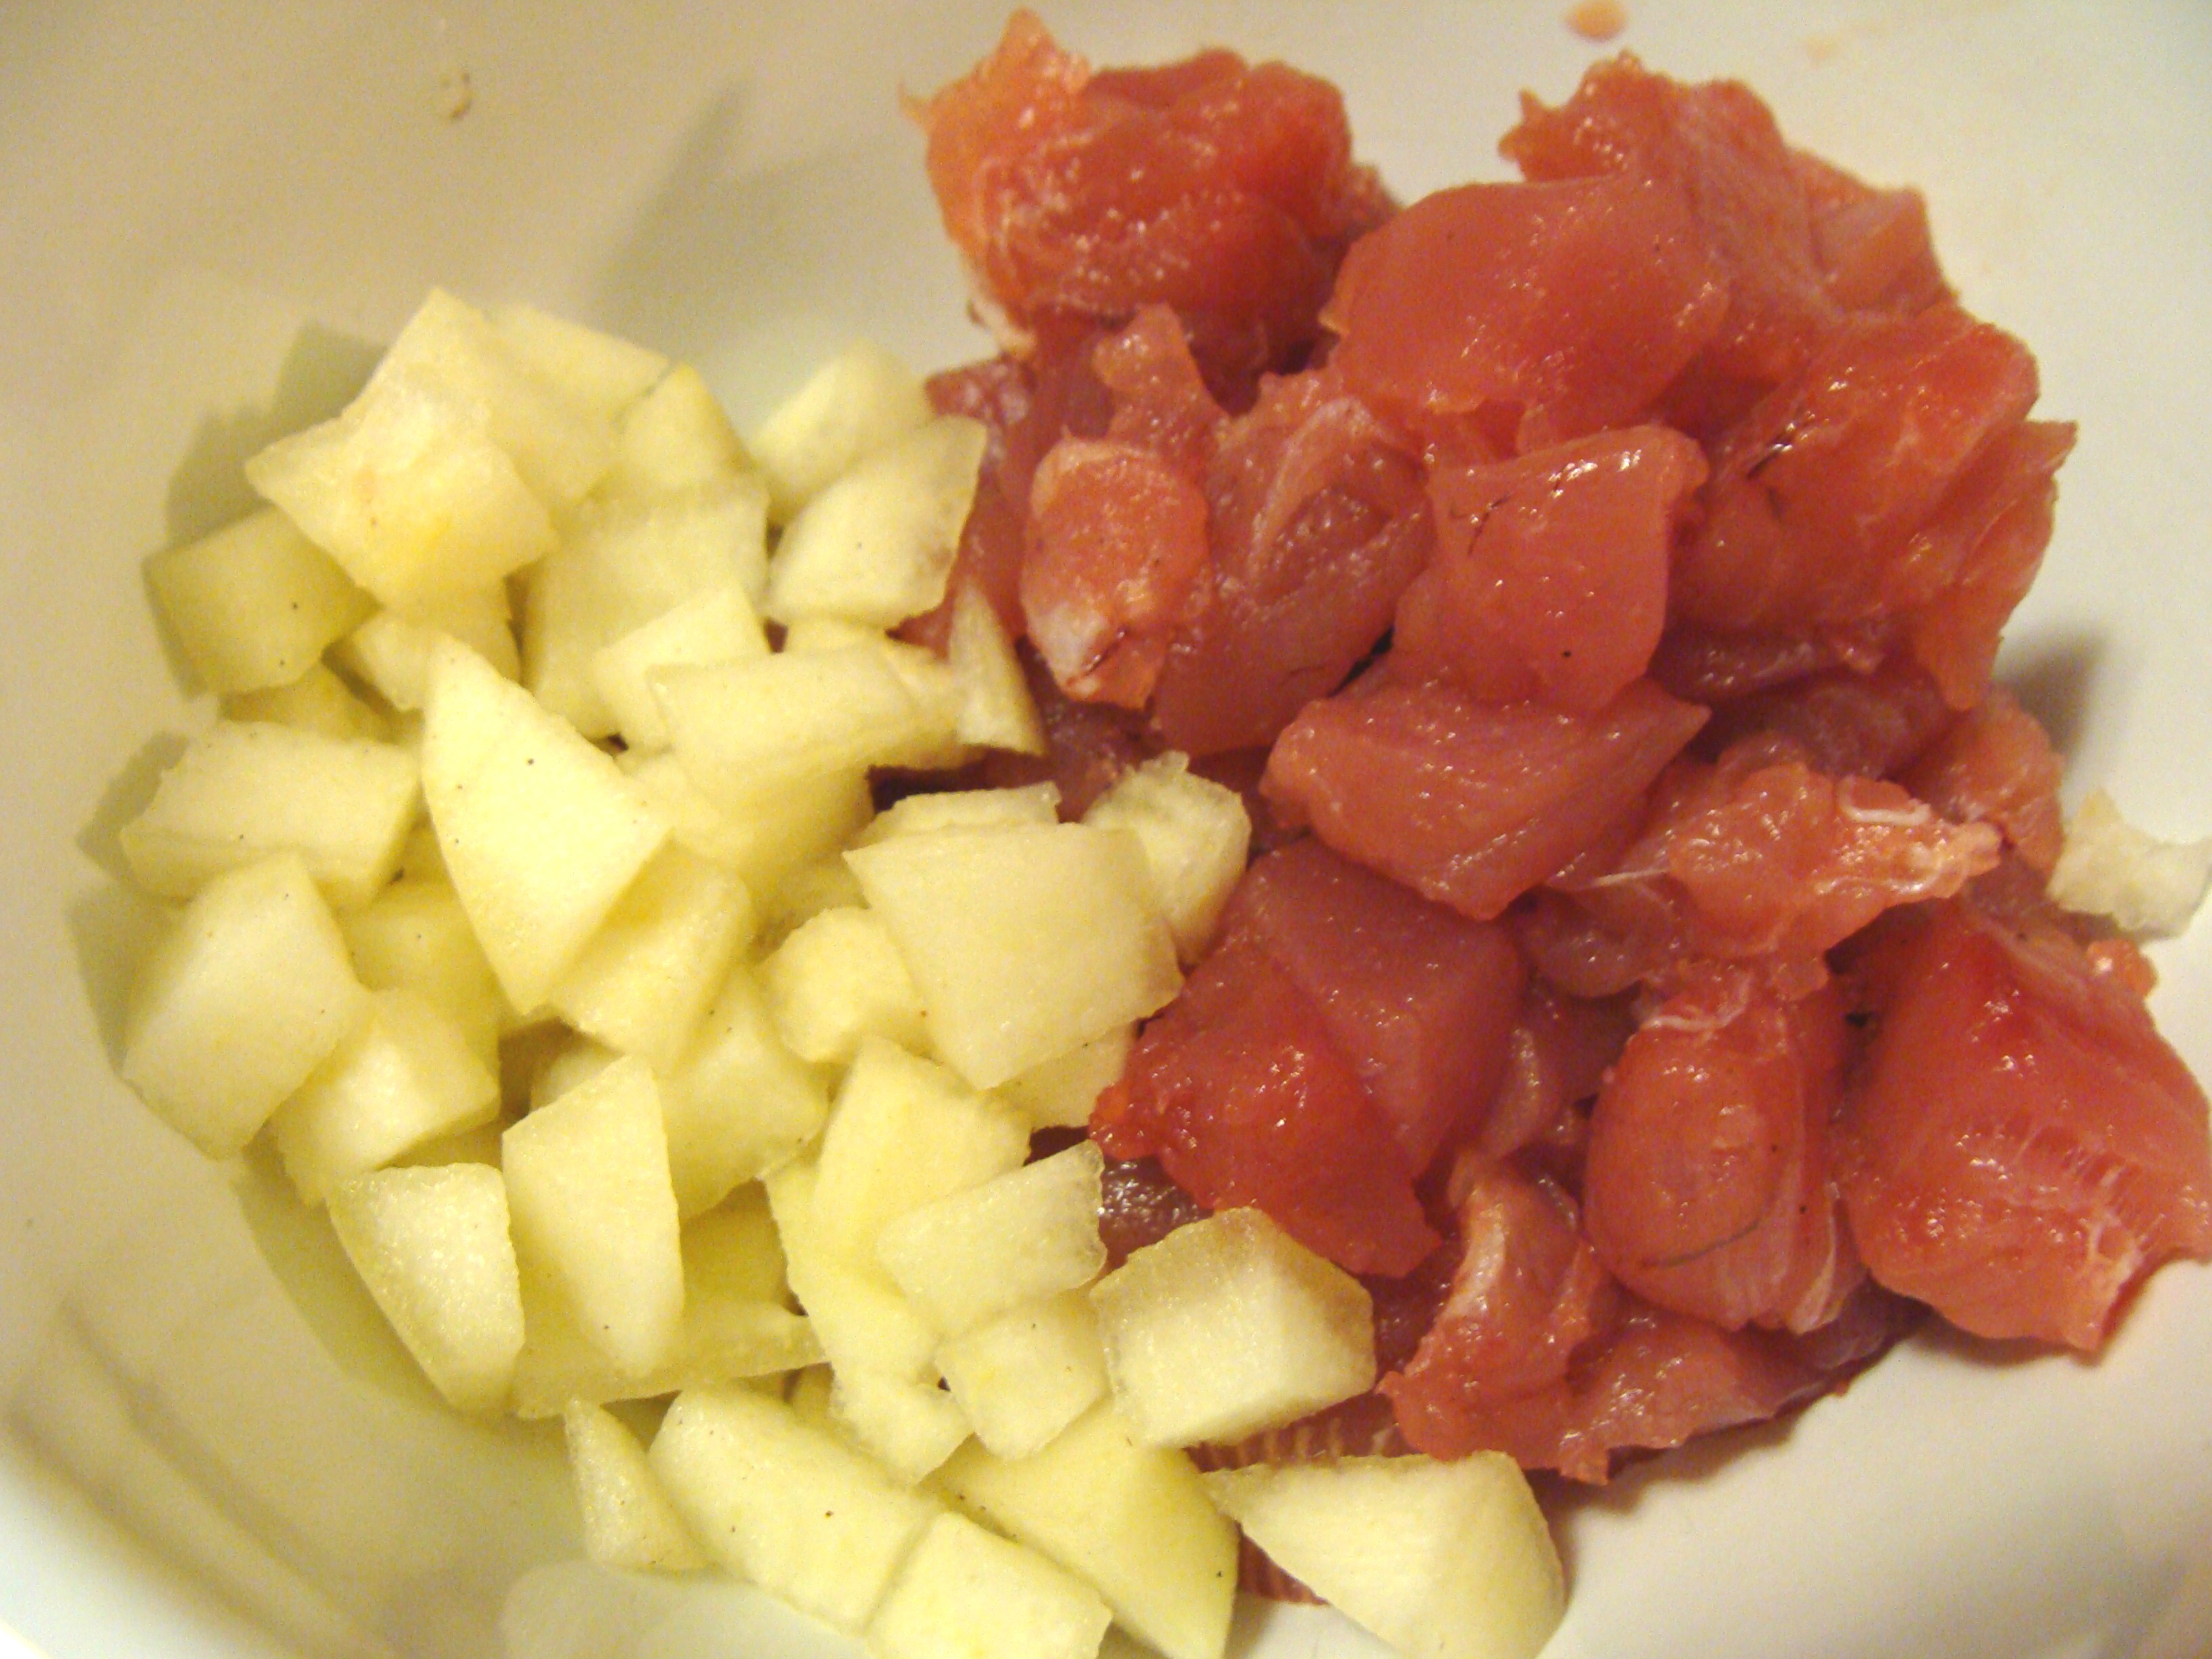
Mix together, in medium glass bowl, oil, egg yolk, salt and spices. Dice the Ahi into small cubes, 1/4 to 1/3 inch is best. Use a very sharp knife or you will not have a lot of success dicing the tuna into small, uniform pieces.
Dice the pear into 1/4 inch cubes. Make sure you are using a relatively firm and not an over-ripe pear.
Toss the ahi into the bowl with the oil mixture, stir to cover tuna with the oil and spices. Add the grated fresh ginger, diced pears, and pine nuts. Stir gently to combine all ingredients.
Serve Mainland-Style Ahi Poke immediately on plain crackers, Lavosh, or Toast Points (toasted bread, crusts cut off, cut into 4 triangles).
Serves 4.

 Not all green salads are created equal. Personally, I don’t like just plain greens. Rather, I like my green salads with a little something extra you can sink your teeth into. So for this salad, I add cooked Broccoli, Balsamic Marinated Cherry Tomatoes and Avocado. Extra texture and extra taste. Extra healthy and extra delicious! Here’s the recipe: Not all green salads are created equal. Personally, I don’t like just plain greens. Rather, I like my green salads with a little something extra you can sink your teeth into. So for this salad, I add cooked Broccoli, Balsamic Marinated Cherry Tomatoes and Avocado. Extra texture and extra taste. Extra healthy and extra delicious! Here’s the recipe:
Ingredients:
1 8 oz Package of Mixed Organic Salad Greens
(I like to use the “Herb” Salad variety, which has both mixed greens and fresh herbs, such as dill and basil)
1 Batch Balsamic Marinated Cherry Tomatoes
2 Ripe Avocados
1 Bunch Whole Scallions (Green Onions),
to yield 2/3 cup diced
1 Pound (16 oz.) Fresh Broccoli
 First, get your cherry tomatoes marinated. See my recipe for Balsamic Marinated Cherry Tomatoes . First, get your cherry tomatoes marinated. See my recipe for Balsamic Marinated Cherry Tomatoes .
Next, set a small pot of water to boil for the broccoli. Toss in a paunch of salt for flavor. When water begins to boil, add the broccoil.
Blanch (leaving broccoli in big chunks of several spears, like the broccoli you see in the picture to the right) in boiling water for 4-5 minutes. Broccoli should be tender, still bright green and not overcooked or mushy — al dente — which means ”to the teeth” in Italian, or in other words, not quite all the way cooked. If you were blanching and then removing the broccoli to saute it with other ingredients on the stove, you might leave the broccoli in the water for only about 2-3 minutes. But this broccoli will not be further cooked and it is not already chopped, so I leave it in just a tad bit longer.
Remove the broccoli from the pot with a skimmer and plunge into a bowl of ice water to cool and stop the cooking. This will also preserve the bright green color. Chop broccoli, including the stems, into bite sized pieces and set aside. In a pinch, you can use thawed, frozen chopped broccoli pieces, but this salad is much better with fresh broccoli.
While broccoli is cooking, place salad green into large salad bowl. Next grab your bunch of scallions (green onions).
  
First, chop off any wilted ends and discard. Then go to the other end and chop off the white ends, about 6 inches long. Immerse rooted white ends in a glass of water and save these for another recipe. You will be left with the center section of the green onions, which should be 4-6 inches long. Chop these. Hopefully, you will end up with about 2/3 cup of chopped scallions. I use the center of the scallion because it is milder in flavor than the white ends.

Gently fold the chopped scallions into your bowl of Balsamic Marinated Cherry Tomatoes. As this sits, the onions will add additional flavor to the tomatoes and viniagrette. Cover and refrigerate if you are not serving the salad immediately.
Next, cut up the avocados, into bite sized pieces.
How to Easily Slice or Dice an Avocado:
The easiest way to cut up a ripe avocado is as follows:
(1) First cut the avocado in half lengthwise from the top stem, going all the way around the fruit.
(2) Pop out the seed by holding the avocado in the palm of your hand, avocado skin side to palm, and gently squeezing the half of the avocado with the seed.
(3) Take out a small paring knife and still holding the avocado in your palm, CAREFULLY and GENTLY slice the avocado, still in the skin, length wise, from top where the stem was to the bottom, WITHOUT PUNCTURING THE SKIN. If you desire sliced avocados, omit the next step and go to step (5). If you want chunks, continue on.
(4) Using the paring knife, make cuts perpendicular to the slices you made in the previous step, in a grid pattern, so the pieces are in the size you desire.
 (5) Once you have made the cuts in the avocado, take a spoon and carefully insert between the flesh and the skin, separating the avocado flesh away from the skin and into a bowl, taking care not to mush the avocado. (5) Once you have made the cuts in the avocado, take a spoon and carefully insert between the flesh and the skin, separating the avocado flesh away from the skin and into a bowl, taking care not to mush the avocado.
Repeat for second avocado. Add the diced avocado pieces straight into the salad bowl full of greens. Do not toss.
Add the broccoli to the bowl with greens and avocado. No need to toss.
Cover and refrigerate bowl of greens, avocado, and broccoli, if not ready to serve immediately.
When ready to serve your salad, add entire contents of the bowl of Balsamic Marinated Cherry Tomatoes (including the extra viniagrette – this is your dressing) to the salad bowl of greens.
Gently toss and serve immediately.
I use these Balsamic Marinated Cherry Tomatoes in many of the salads I make, including my Weekend Gourmet Signature Green Salad and my Independence Day Orzo Salad. Quick and simple to make, fresh and delicious. Without the tomatoes, it’s a simple balsamic viniagrette recipe.

Balsamic Marinated Cherry Tomatoes
1 Pint Box Organic Cherry Tomatoes
Balsamic Viniagrette
1 Tsp Kosher Salt
1/2 Tsp Garlic Powder
3/8 Cup Organic Extra Virgin Olive Oil
1/4 Cup Balsamic Vinegar
1 Tsp Fresh Ground Black Pepper
Slice Cherry Tomatoes in half from the top. Set aside.

Whisk together Salt, Pepper Garlic Powder, Oil and Vinegar in medium bowl until it forms an emulsion.
 
Add tomatoes and stir slightly to ensure that all tomatoes are covered, absorbing marinade. Let sit for at least 1/2 hour, gently stirring once or twice. If using later, cover and refrigerate. These may be drained added to any salad, or you may also add the liquid for a balsamic viniagrette dressing.

 Photo by Karl Meinhardt, (c) 2010, South Seas Photography. Recently, some friends invited us over for a casual supper. We were greeted by the warm ambiance of Karl & Gina’s tropical home, near Kailua Beach. We started with light pupus, including cheese and fruit, as well as having some of my favorite Smoked Ahi Spread.
Karl and Gina proceeded to serve up a delicious spread which included Grilled Tri-Trip, Garlic Bread and a crisp green salad. Simple, fresh and tasty. And the champagne wasn’t bad either! Needless to say, it was a very enjoyable evening, with great food, old friends and fun conversation. My husband and I immediately decided that this was a meal we would replicate at home. And the opportunity arose soon enough.
Yesterday, the Hawaiian islands were expecting a tsunami. You may have heard about it on the news – one of the reprecussions of the tragic, recent 8.8 earthquake in Chile. Both my husband (who was busy working at his job with the Marines and Homeland Defense) and I had an extremely stressful day, as we evacuated our home in Kailua and prepared for the worst.
Fortunately, the tsunami never arrived and the Hawaiian islands were spared. We were all incredibly relieved and decided to celebrate with a great meal on the grill. And so the Tsunami Tri-Tip evolved.
Tsunami Tri-Tip is quick, easy and tasty. The Harissa and Montreal Seasoning give it a little spice. Karl still gets credit, though I am not sure what he uses for his rub. This is how we make it:
 Tsunami Tri-Tip Tsunami Tri-Tip
1- Approx. 1.5 pound Trip Trip Roast
1/4 Cup Montreal Seasoning
Harissa Paste (pick up at any gourmet food store and many grocery stores)
Rub Harissa paste all over meat, use as much a you need to very lightly cover all the meat, about 1 oz. If you like more spice, add a little more. Harissa contains chili, and spices like coriander and caraway, among other ingredients, so use with care.
Spread Montreal Seasoning on a plate and dip the meat in the seasoning, so that it sticks to the meat. This can be done a few hours to a day in advance. If you do this in advance, wrap the meat in plastic wrap after the rub is applied and refrigerate.
Preheat grill on high. When the grill reaches about 400 degrees put the meat on, and turn down heat to Medium. Close grill lid. Cook to desired doneness, approx. 7 minutes on one side. Flip and cook 7 minutes in the other side.
Slice Tsunami Tri-Tip and serve pupu style (in bite-sized medallions).

Tangy Garlic Bread
1 Large, Soft, French loaf
1 Stick, Salted Butter
1/2 cup Shaved Parmesan Cheese
6 Cloves Fresh Garlic,
(smashed well and diced or sent through a garlic press)
Turn oven on Low Broil. If your oven does not have this setting, make sure your oven rack is pretty far away from the broiler flame and watch the bread closely while cooking, because it will very quickly burn.
Mix butter and garlic together. Cut loaf in half, lengthwise, separating top and bottom. Put back together and cut loaf again, across the top, into 2 or 3 pieces, depending upon how long the bread is. You want it to fit on the baking sheet. Spread butter mixture on bread. Sprinkle top with shaved Parmesan Cheese.

Toast in oven until slightly browned at edges and butter and cheese are melted.

Serve Tsunami Tri-Tip with Tangy Garlic Bread, and a crisp green salad. Feel free to make sandwiches with the meat and bread. Enjoy!!
You may have already read that I am attempting to do Kitchen Remodel. Well, it is only a part remodel, in actuality because I am going to redo and reuse all my old cabinets, keep all existing appliances (luckily, all newer) and try to stay otherwise on a limited budget. This is not exactly easy considering the cramped, dark, poorly laid out kitchen that I started with.
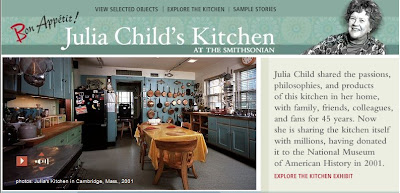
As a result, I have spent most of my time and dollars thinking about and trying to improve basic functionality. The focus is concepts of space planning and layout — and lighting — also very important. So I decided to take a gander at Julia’s Child’s Kitchen, now memorialized in the Smithsonian Institution, to see how she had things arranged. I figured, why not? Julia moved into her Cambridge home in 1961, the same year my house was built. Her kitchen was 14 x 20, which is pretty close to the overall space I now have allocated to mine. Her cabinets are now dated (like mine) and she had none of the most modern and pricey conveniences (also, like mine). Nevertheless, for 45 years she used this kitchen to cook up a storm and a filmed a cooking show there to boot! Apparently, quite a lot of thought was put into the design of her kitchen, both to accomodate her prolific kitchen artistry and her 6’2″ frame, as well as the TV show she filmed there.
So, low and behold, Julia Child’s Kitchen is proof that a functional space does not always have to look like one in a magazine! happended to stumble along the interactive online version of the kitchen recently and found it to be pretty cool, so I thought I would share the link.
Julia’s Online Interactive Kitchen allows you to browse the various work stations on her kitchen, giving you and idea how she organized her tools and supplies, and how she stored her dry goods. It also has vignettes featuring personal and kitschy items she had in her kitchen, sharing with online users more of her unique personality.
Noteworthy Areas of Julia’s Kitchen:
 The Wall of Pans - She has an entire peg board wall of cookware, much of it copper or copper bottomed. She also has peg board racks for lots of cooking tools and gadgets in various areas of the kitchen. I like the idea of the convenience and it showcases her nice items beautifully, but I am not jazzed about the pegboard. IMHO, Pegboard and particle board have NO place in a Hawaii kitchen, with the humidity here. They just don’t last well. She did paint it a lovely French Blue, but I need to use this idea a bit differently in my own kitchen. The Wall of Pans - She has an entire peg board wall of cookware, much of it copper or copper bottomed. She also has peg board racks for lots of cooking tools and gadgets in various areas of the kitchen. I like the idea of the convenience and it showcases her nice items beautifully, but I am not jazzed about the pegboard. IMHO, Pegboard and particle board have NO place in a Hawaii kitchen, with the humidity here. They just don’t last well. She did paint it a lovely French Blue, but I need to use this idea a bit differently in my own kitchen.
Mixed Working Surfaces - I like that Julia has a variety of working surfaces in her kitchen. She has an integrated stainless steel sink/drainboard counter, a separate butcher block, and maple countertops on three different work stations. She had no soapstone, granite or other hard surfaces. I’d like to see concrete counters with an integrated drainboard into my farm sink in my own kitchen and at least one hardwood work space, most likely on my center island.
Work Stations - Julia had all her baking and pastry supplied organized on one side of the kitchen. She kept her oils and vinegars by the stove. She did a good job in organizing her work stations for maximum functionality.
I am using a similar concept in my own kitchen, creating three (besides the stovetop and sink) functional areas:
(1) Beverage Center: located between the refigerator and sink. This is where glassware is kept. Near the water/ice maker. The coffee maker and grinder are here, as well.
(2) Wet Prep Area: Between sink and stove. Pull-out garbage underneath, for easy disposal. Cutting block here. Knives above. Perfect for cutting and chopping and getting ingredients straight to the pan, with easy clean-up to sink.
(3) Dry Prep Area: On kitchen island across from sink, stove and refigerator. Integrated cutting surface here. Perfect place to make a sandwich or mix ingredients.
Colorful Painted Cabinets – I love colorful kitchens! Julia’s was blue and green. (Mine is going to be green with accents of bamboo and dark wood.)
Personal Touches - Julia’s Kitchen has many personal touches and even some unique one-of-a-kind items, which I like. Not too sure about hanging paintings on my cabinets doors, but to each his own. Some people like kitchens that are sterile and minimalist, but I like a little personality.
What do you think about Julia’s kitchen? What do YOU like and dislike? What are your best tips for desiging a functional kitchen?
Not exactly gourmet, but certainly delicious, is the homemade ice cream you can make with a pretty novel little gadget I call the Ice Cream Ball. It’s actually called the Play N Freeze Ice Cream Maker and it is sold by UCO. I got this great tool from my son for Christmas a few years ago and it has already gotten some good use.
Just like a regular ice cream maker, it freezes your own combination of cream and other goodies, using ice and rock salt. What is great about this ice cream maker is that it is in the shape of a ball, and the kids toss it around, like a toy, to make the ice cream freeze. No electricity or batteries required and so much fun!!
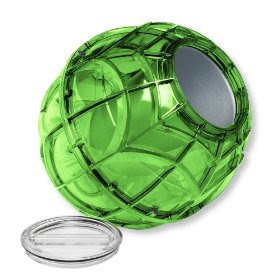
We used it the other night when we had friends over for a barbeque and will continue to use it whenever we want delicious, freshly made ice cream.
Be warned, though, this is not perfect ice-cream – it may be a little, lumpy or too creamy in consistency. The beauty is in the fun of making it and in having control over the ingredients you are putting into your body.
Here is the link to the Ice Cream Ball on Amazon, if you’d like to check it out and here are a few of my recipes for home-made ice cream in a ball.
Strawberry-Banana Ice Cream (Preferrably all organic ingredients used)
2 mashed ripe bananas
1 1/2 cups heavy whipping cream
2/3 cup sugar
1 cup partially thawed, chopped frozen strawberries
Island Dream Ice Cream
2 mashed ripe bananas
1 1/2 cups heavy whipping cream
1/2 cup chopped macadamia nuts
1/2 cup sugar
2 Tsp Vanilla extract
1/4 cup shredded sweetened coconut
~ Enjoy!!
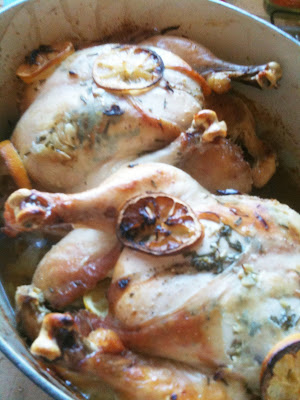
Rosemary Lemon Chicken is my husband’s favorite dish. He would argue with that statement, but I know it is true, because it is what he asks me to make it more than any other recipe. In fact, he would like me to bake a chicken at least once a week and sometimes, I do.
 There are so many good reasons to do so …. delicious, tender chicken the first night, chicken sandwiches the next day, chicken enchiladas for dinner the next night, and chicken soup or chicken stock, for a savory and complete end to the bird. There are so many good reasons to do so …. delicious, tender chicken the first night, chicken sandwiches the next day, chicken enchiladas for dinner the next night, and chicken soup or chicken stock, for a savory and complete end to the bird.
Homemade oven-roasted chicken will always beat the store-bought Costco or Safeway version in tenderness and taste. In addition, you know there will be no MSG or other preservatives and chemicals. I make sure to use only organic – free range chickens whenever possible. It costs a little more, but definitely worth it.
Oven-roasted chicken is a very easy dish to make, as well. In fact, once you put it in the oven, set the timer and pretty much forget about it.
Rosemary Lemon Chicken
1 Small Young Frying Chicken (approx. 5 lbs)
2 Lemons
1 Medium Yellow Onion
3 large Sprigs Rosemary, leaves removed and finely chopped
2 TBS Butter
1 Large Head Garlic
Salt
Pepper
Preheat oven to 425 degrees.
Remove all giblets and anything else from the inside of the chicken. Rinse with water. Place on baking sheet. Pat dry. Liberally salt and pepper outside of bird, including the inside of the cavity. Lift up skin on breast from near the cavity, separating skin from the muscle and making two small pockets. Add a pinch or two of salt and pepper in this area too.
Roughly chop onion into large chunks. Cut Garlic head in half horizontally, leaving skin on. Chop one lemon into large chunks. Squeeze lemon juice from the lemon over the bird. Stuff lemon peels/pulp chunks, with onions and bottom half of head of garlic (skin still on), into the bird.
Take second lemon and cut in half between ends with stems. Zest 1/2 of the lemon. Slice the other half into attractive slices, about 1/4 inch thick. Set aside. Take top half of garlic head and peel the cloves. Run through a garlic press and mix with lemon zest. Remove leaves from the rosemary stem. Finely chop about half of the rosemary and mix with the lemon zest/garlic and 2 TBS butter.
Rub lemon zest/rosemary/garlic/butter mixture inside breast pockets and on top and sides of chicken. Toss remaining rosemary leaves on top and around chicken. Some people dress the bird by tying the legs together with kitchen string and tucking the wings under. I never do and the chicken turns out fine. But I will leave that up to you.
Place stuffed bird, breast side up, in medium-sized cast iron dutch oven, with lid off. Garnish top with reserved lemon slices. Pour in 1 box of chicken stock. Place pot in preheated oven. Immediately reduce oven temperature to 375 degrees. Set timer for 1 hour, 45 minutes and bake. Remove chicken from pan and let rest on a serving platter for 15 minutes and serve. Any remaining juices may be strained and used to make a light sauce, by reducing with 1/2 cup of white wine.
Enjoy!
|
|


 Basic Quiche


